Introduction to Crispy Chicken Kiev Delight
Hello, fellow home cooks! Today, I’m so excited to share a recipe that truly makes my tastebuds sing: the Crispy Chicken Kiev Delight.
I know life gets hectic, right? Between work, family, and just trying to keep everything afloat, finding a delicious yet manageable meal can feel like a treasure hunt.
That’s where this gem comes in! It’s a wonderful way to bring a restaurant-quality dish right to your own table.
This recipe is your new best friend for weeknight dinners. It’s also a guaranteed crowd-pleaser for those special occasions.
Get ready for tender chicken and a burst of herby, garlicky goodness. It’s pure comfort food magic.
Table of Contents
Why You’ll Love This Crispy Chicken Kiev Delight
This recipe is pure joy on a plate. It’s surprisingly simple to make. You get amazing flavor without hours in the kitchen.
It’s a fantastic way to impress without the stress. Plus, that golden, crispy coating? Absolutely irresistible.
Your family will think you’re a culinary wizard. Enjoy a delicious meal with ease.
This dish is a true winner. It balances elegance and comfort perfectly.
Ingredients for Crispy Chicken Kiev Delight
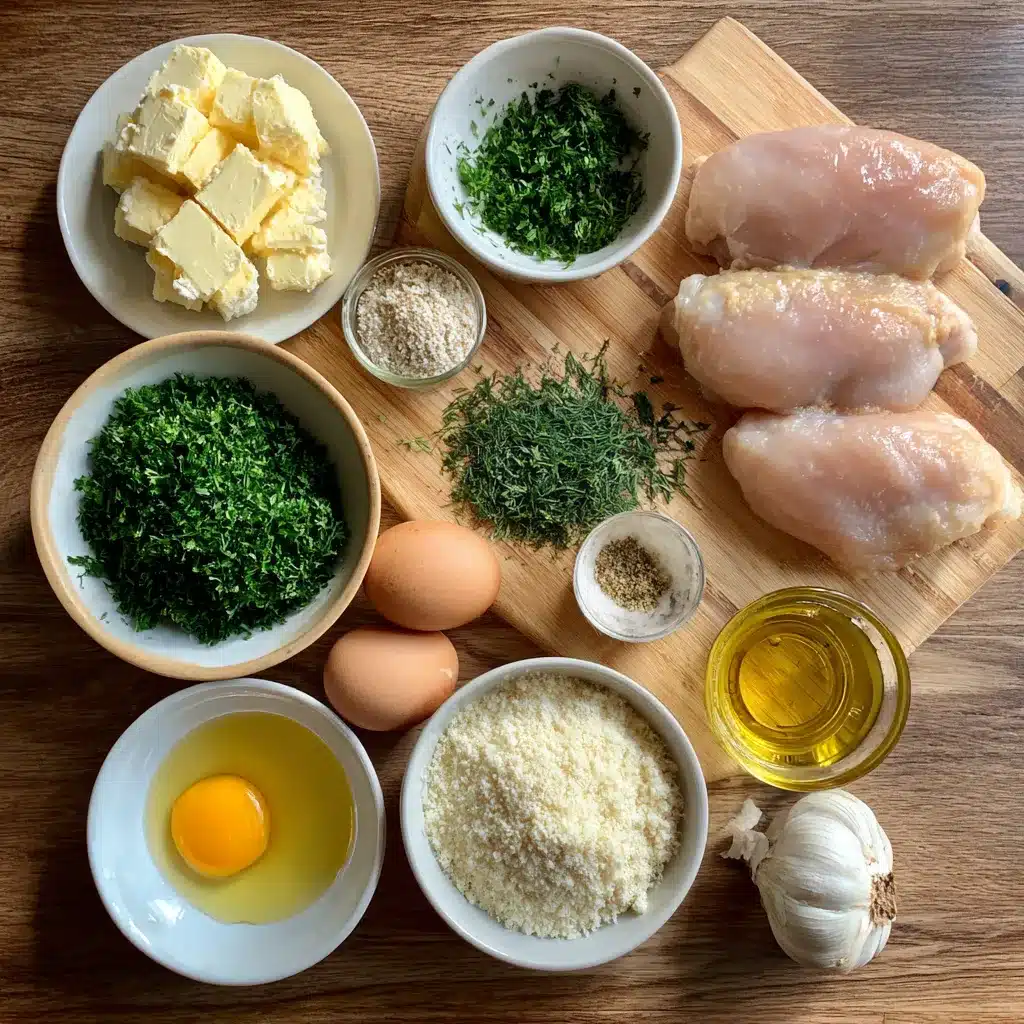
Let’s talk about what makes this Crispy Chicken Kiev Delight so special. You’ll find most of these right in your pantry.
For those who love to print recipes, all the exact measurements are conveniently listed at the end.
The Star: Chicken Breasts
We start with boneless, skinless chicken breasts. They are the perfect canvas for our flavors.
Choose good quality chicken for the best results. It cooks quickly and evenly.
The Flavorful Heart: Garlic Herb Butter
This is where the magic happens! A simple mix of rich butter and fresh aromatics.
Fresh Herbs for Brightness
Parsley and dill bring a wonderful freshness. They cut through the richness beautifully.
Feel free to use other herbs too. Chives or tarragon are lovely additions.
Garlic for a Punch
Fresh minced garlic is key. It adds a pungent, savory depth.
A little garlic goes a long way here. It truly elevates the butter.
Butter for Richness
Unsalted butter forms the base. It melts into a glorious, flavorful sauce.
Make sure your butter is softened. This makes mixing so much easier.
The Crispy Coating
This coating is what gives our chicken its satisfying crunch. It’s a classic trio.
Flour for Adhesion
All-purpose flour helps the egg stick. It creates a base layer for the breadcrumbs.
A light dusting is all you need. It ensures an even coating.
Eggs as the Binder
Beaten eggs act as the glue. They hold the breadcrumbs firmly in place.
Whisk them well for a smooth dip. This helps coat the chicken evenly.
Panko Breadcrumbs for Crunch
Panko breadcrumbs are my secret weapon. They create an incredibly light, crispy shell.
They’re much airier than regular crumbs. This means more crunch!
Parmesan Cheese for Extra Flavor (Optional)
A little grated Parmesan adds a nutty, salty note. It’s a simple upgrade.
Mix it right into the breadcrumbs. It adds a lovely golden hue too.
For Baking Perfection
A little fat ensures a golden crust. It also prevents sticking.
Olive Oil or Melted Butter
A drizzle of olive oil or melted butter is perfect. It helps the coating brown beautifully.
This ensures a gorgeous finish. Your chicken will look as good as it tastes.
How to Make Crispy Chicken Kiev Delight

Now for the fun part – actually making this deliciousness! It’s easier than you think. Follow these steps for a perfect Crispy Chicken Kiev Delight.
Step 1: Prepare the Oven and Herb Butter
First, get your oven preheating. Set it to 400°F (200°C).
Next, make that amazing herb butter. Mix softened butter with garlic. Add parsley and dill. Season with salt and pepper. Stir it all together well.
Step 2: Tenderize the Chicken Breasts
Take your chicken breasts. Put one between plastic wrap. Use a meat mallet or a heavy pan. Pound them gently. Aim for about 1/2 inch thickness. Repeat with the other breast. This helps them cook evenly.
Step 3: Stuff with Flavorful Butter
Lay a tenderized chicken breast flat. Spoon about a tablespoon of herb butter onto the center. Don’t overfill it.
Step 4: Seal the Chicken for Baking
Carefully fold the chicken breast sides over the butter. You want to completely enclose it. This is crucial for the juicy center. Toothpicks can help secure it.
Step 5: Set Up Your Breading Station
Get three shallow dishes ready. Put flour in the first dish. Whisk your eggs in the second dish. Mix panko breadcrumbs and Parmesan in the third.
Step 6: Coat for Ultimate Crispy Chicken Kiev
Dredge each chicken piece in flour. Make sure it’s fully coated. Then, dip it in the beaten eggs. Let any excess drip off. Finally, coat it thoroughly with the panko mixture. Press gently. This creates that fantastic crunchy crust.
Step 7: Bake to Golden Perfection
Place the coated chicken on a baking sheet. Line it with parchment paper first. Drizzle or brush the tops with olive oil. Bake for 25-30 minutes. Watch for a golden brown, crispy coating. The chicken should be cooked through.
Step 8: Rest Before Serving
Once baked, let your chicken rest. Give it a few minutes off the heat. This allows the juices to redistribute. Then, serve your beautiful Crispy Chicken Kiev Delight!
Tips for Success
Here are a few pointers for your Crispy Chicken Kiev Delight. They ensure a perfect result every time.
- Securely seal the butter inside. This prevents leaks during baking.
- Avoid overcrowding the baking sheet. Give the chicken space to crisp up.
- For extra crunch, try a quick broil. Just watch it closely so it doesn’t burn.
Equipment Needed
Let’s gather our tools for this Crispy Chicken Kiev Delight adventure.
- Plastic wrap (or parchment paper) for pounding.
- A meat mallet or a sturdy, heavy pan works.
- A small bowl for mixing the butter.
- Three shallow dishes for your breading station.
- A baking sheet for cooking.
- Parchment paper is great for easy cleanup.
Variations for Your Crispy Chicken Kiev Delight
Want to mix things up? This Crispy Chicken Kiev Delight is wonderfully adaptable.
Here are a few ideas to personalize your dish.
- Spicy Kick: Stir a pinch of red pepper flakes into the herb butter. This adds a delightful warmth.
- Cheesy Center: Mix shredded mozzarella or Gruyere into the herb butter. It creates a gooey, delicious surprise.
- Gluten-Free: Easily make this recipe gluten-free. Use gluten-free breadcrumbs and all-purpose flour.
- Herb Swap: Experiment with different fresh herbs. Chives or tarragon are fantastic alternatives to parsley and dill.
Serving Suggestions for Crispy Chicken Kiev Delight
Now that you’ve mastered the Crispy Chicken Kiev Delight, let’s talk about what to serve with it. These pairings make the meal complete.
- Serve alongside creamy mashed potatoes or fluffy rice.
- Pair with steamed or roasted green vegetables like asparagus or broccoli.
- A light, crisp salad complements the richness of the chicken.
FAQs about Crispy Chicken Kiev Delight
Got questions about making this delightful Crispy Chicken Kiev Delight? I’ve got answers!
Can I make the herb butter ahead of time for my Crispy Chicken Kiev Delight?
Yes, absolutely! You can prepare the herb butter up to two days in advance. Just store it in an airtight container in the refrigerator. Let it soften slightly before stuffing the chicken.
Why is my butter leaking out of my Chicken Kiev?
Butter often leaks if the chicken isn’t sealed properly. Ensure you fold the chicken over the butter completely. You can even overlap the edges. Using toothpicks can help secure the seal.
How can I ensure my Chicken Kiev is truly crispy?
For the ultimate crunch on your Crispy Chicken Kiev Delight, use panko breadcrumbs. Also, make sure not to overcrowd the baking sheet. This allows air to circulate for maximum crispiness. A final quick broil can also help.
Can I freeze uncooked Chicken Kiev?
You sure can! Prepare the chicken completely, including the breading. Place the uncooked portions on a baking sheet and freeze until solid. Then, transfer them to a freezer-safe bag or container. Bake directly from frozen, adding a few extra minutes to the cooking time.
Final Thoughts
So there you have it, my friends! Creating this Crispy Chicken Kiev Delight is truly a rewarding experience. It’s more than just a meal; it’s a little bit of culinary theater right in your own kitchen.
The satisfaction of seeing that golden crust and knowing you’ve made something so delicious is immense. It’s a dish that brings smiles to faces and warmth to the table.
I hope you give this recipe a try. It’s a fantastic way to treat yourself and your loved ones. Enjoy every single, crispy, flavorful bite!
PrintCrispy Chicken Kiev Delight: Your Tastebuds Will Sing!
- Total Time: 50 minutes
- Yield: 2 servings 1x
- Diet: Vegetarian
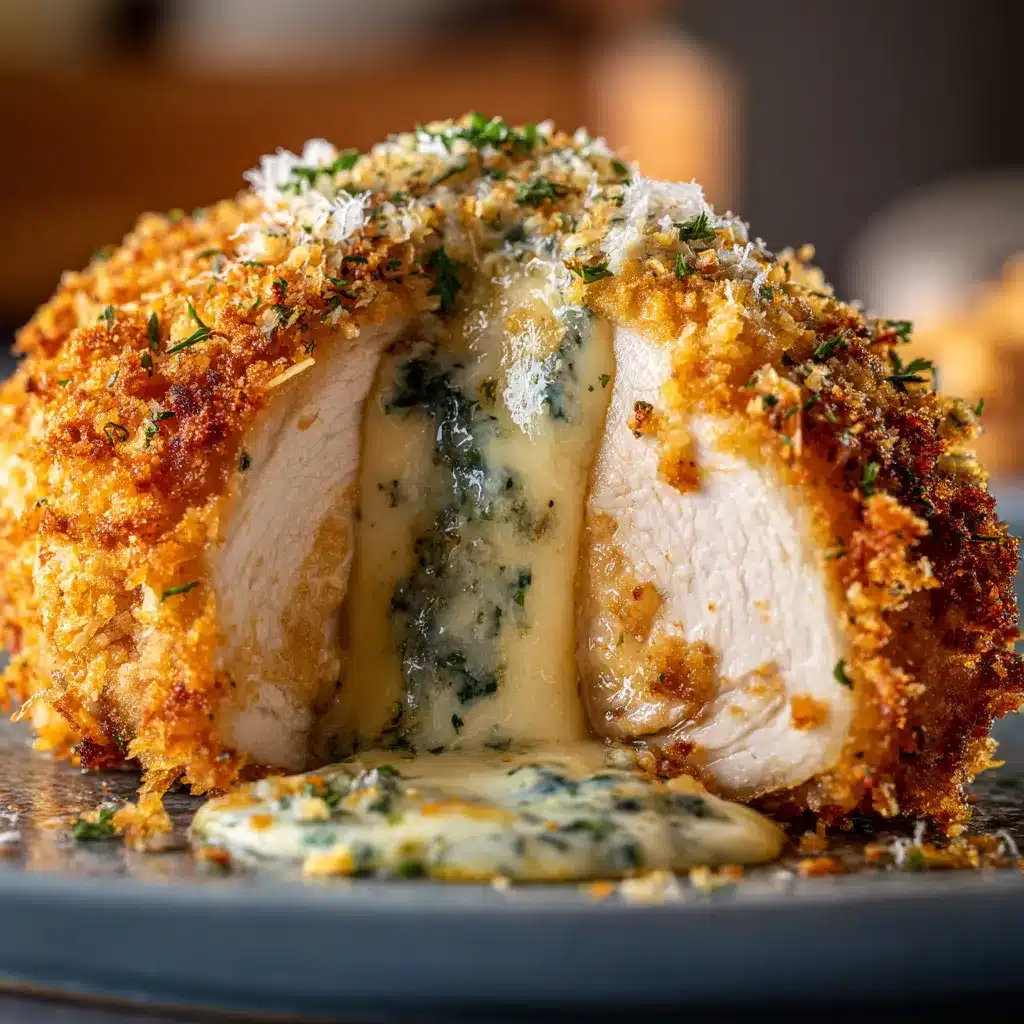
Description
A delightful and crispy take on the classic Chicken Kiev, featuring a tender chicken breast filled with herbed garlic butter, coated in a crunchy breadcrumb crust, and baked to golden perfection.
Ingredients
- 2 boneless, skinless chicken breasts
- 4 tablespoons unsalted butter, softened
- 2 cloves garlic, minced
- 2 tablespoons chopped fresh parsley
- 1 tablespoon chopped fresh dill
- Salt and freshly ground black pepper to taste
- 1/2 cup all-purpose flour
- 2 large eggs, beaten
- 1 cup panko breadcrumbs
- 1/4 cup grated Parmesan cheese (optional)
- 2 tablespoons olive oil or melted butter for baking
Instructions
- Preheat your oven to 400°F (200°C).
- In a small bowl, combine the softened butter, minced garlic, chopped parsley, chopped dill, salt, and pepper. Mix well to create the herb butter filling.
- Place each chicken breast between two pieces of plastic wrap and pound them to an even thickness of about 1/2 inch.
- Spoon about 1 tablespoon of the herb butter mixture onto the center of each chicken breast.
- Fold the sides of the chicken breast over the butter to enclose it completely, creating a sealed packet. You can use toothpicks to secure them if needed.
- Set up three shallow dishes. Place the flour in the first, the beaten eggs in the second, and the panko breadcrumbs mixed with Parmesan cheese (if using) in the third.
- Dredge each chicken breast first in the flour, ensuring it’s fully coated, then dip it into the egg mixture, allowing excess to drip off, and finally coat it thoroughly with the panko breadcrumb mixture.
- Place the coated chicken breasts on a baking sheet lined with parchment paper. Drizzle or brush the tops with olive oil or melted butter.
- Bake for 25-30 minutes, or until the chicken is cooked through and the coating is golden brown and crispy. The internal temperature should reach 165°F (74°C).
- Let the chicken rest for a few minutes before serving.
Notes
- For an extra crispy coating, you can double-dip the chicken in the egg and breadcrumbs.
- Ensure the chicken is completely sealed to prevent the butter from leaking out during baking.
- Serve with your favorite side dishes like mashed potatoes, roasted vegetables, or a fresh salad.
- Prep Time: 20 minutes
- Cook Time: 30 minutes
- Category: Main Course
- Method: Baking
- Cuisine: European
Nutrition
- Serving Size: 1 chicken breast
- Calories: Approximately 450-550 kcal (will vary based on exact ingredients and portion size)
- Sugar: Low
- Sodium: Moderate
- Fat: High
- Saturated Fat: Moderate to High
- Unsaturated Fat: Moderate
- Trans Fat: Negligible
- Carbohydrates: Moderate
- Fiber: Low
- Protein: High
- Cholesterol: Moderate to High